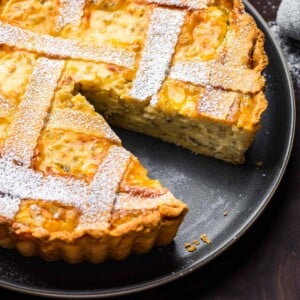
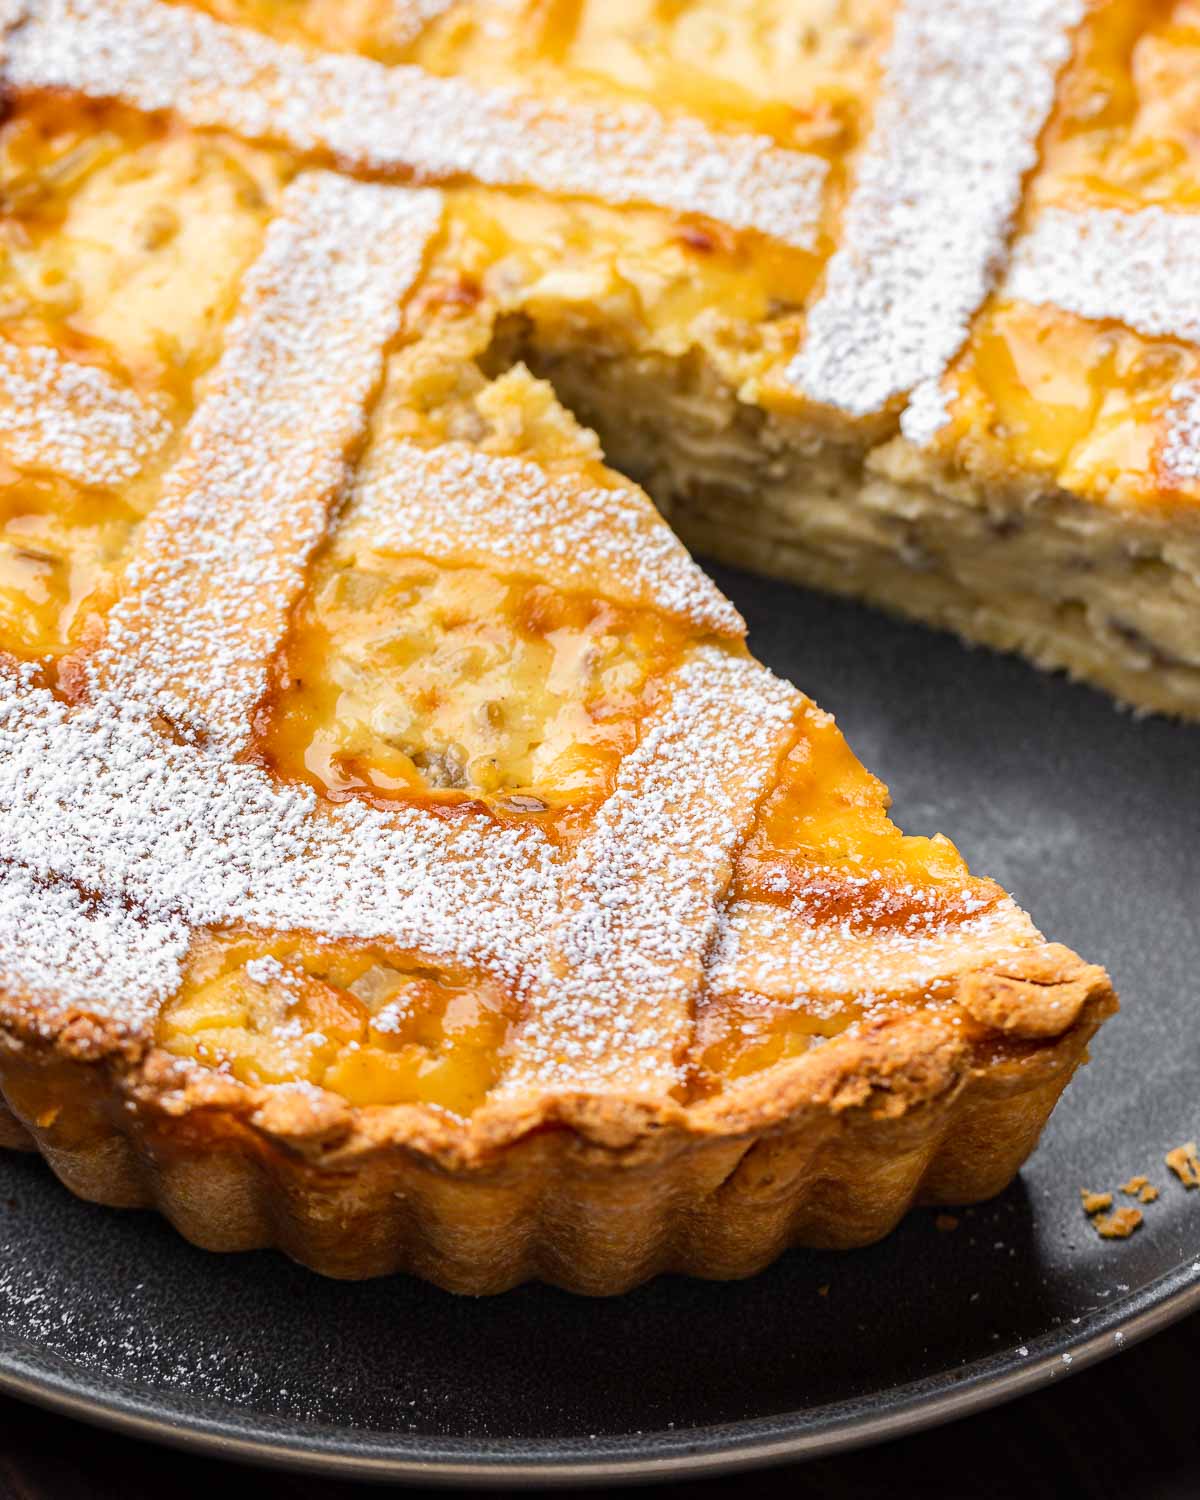
Pastiera Napoletana, also known as grain pie, is a dessert traditionally served on Easter but too delicious to not enjoy all year round! Homemade dough is filled with a creamy filling of ricotta, grano cotto (cooked wheat berries), citron, orange blossom water, and orange zest, baked until golden and topped with plenty of powdered sugar.
Most people know that Easter is approaching when they see chocolate bunnies in the grocery store.
But for me, it’s when I see an end cap filled with cans of grano cotto, the pre-cooked wheat berries used to make Pastiera Napoletana.
Pastiera is traditionally made a few days prior to Easter to allow the flavors to intensify, and served as dessert on Easter Sunday, topped with plenty of powdered sugar.
This very special pie might just be the best of all Easter food, with pizzagaina, and easter bread as close runners-up.
Its outrageous flavor from the orange zest, orange blossom water, and citron is rivaled only by the array of textures from the grano cotto, ricotta, and the flaky pie crust.
And it’s even better the next morning for breakfast with a cup of coffee, as is our orange olive oil cake.
Many Italian-Americans would prefer to pick one up at a local bakery, but I’m here to walk you through the process of making Pastiera Napoletana at home, which is simpler than you may think.
Step by step process for Pastiera Napoletana
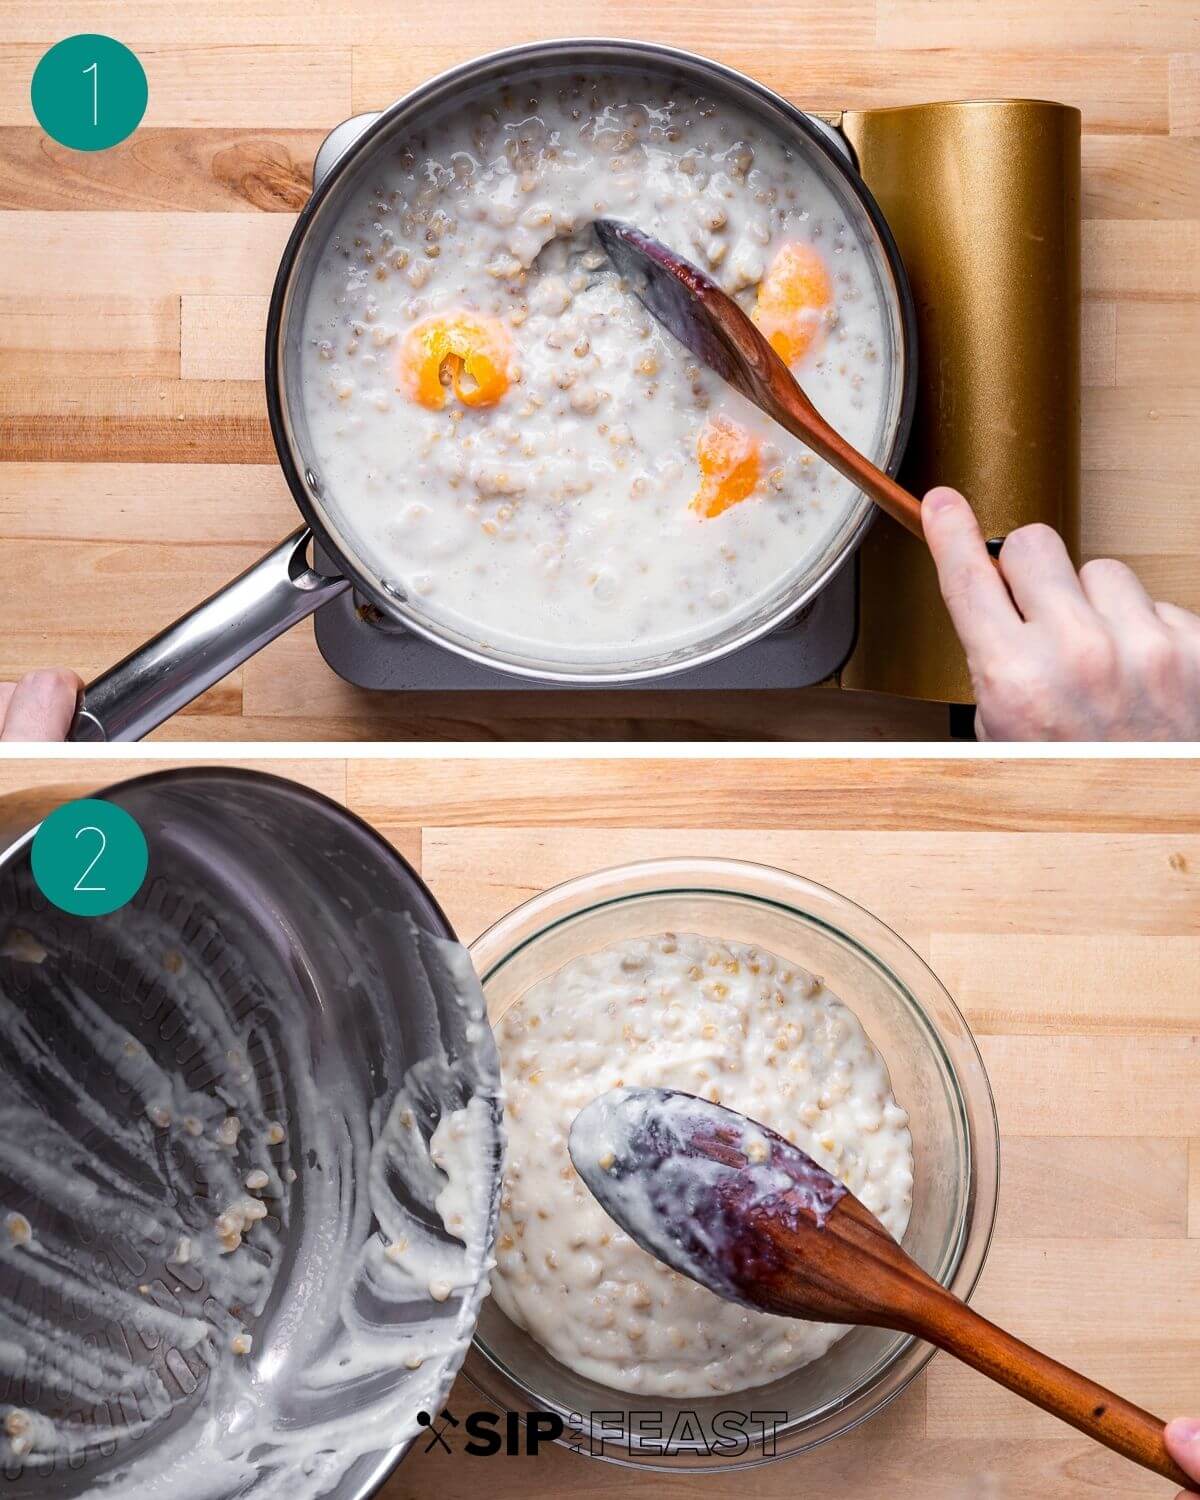
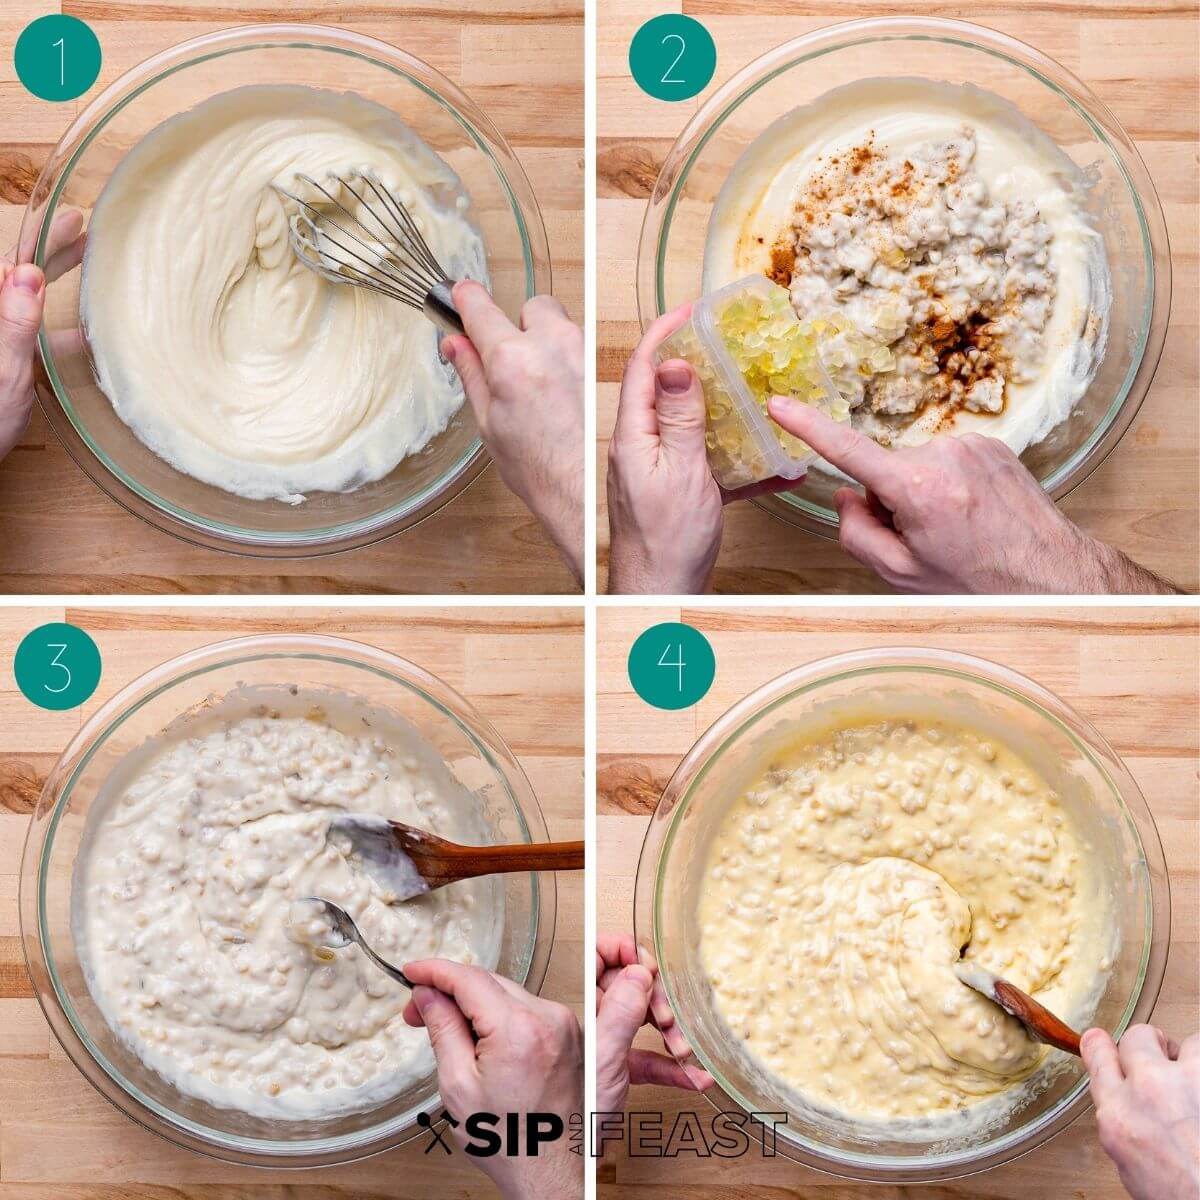
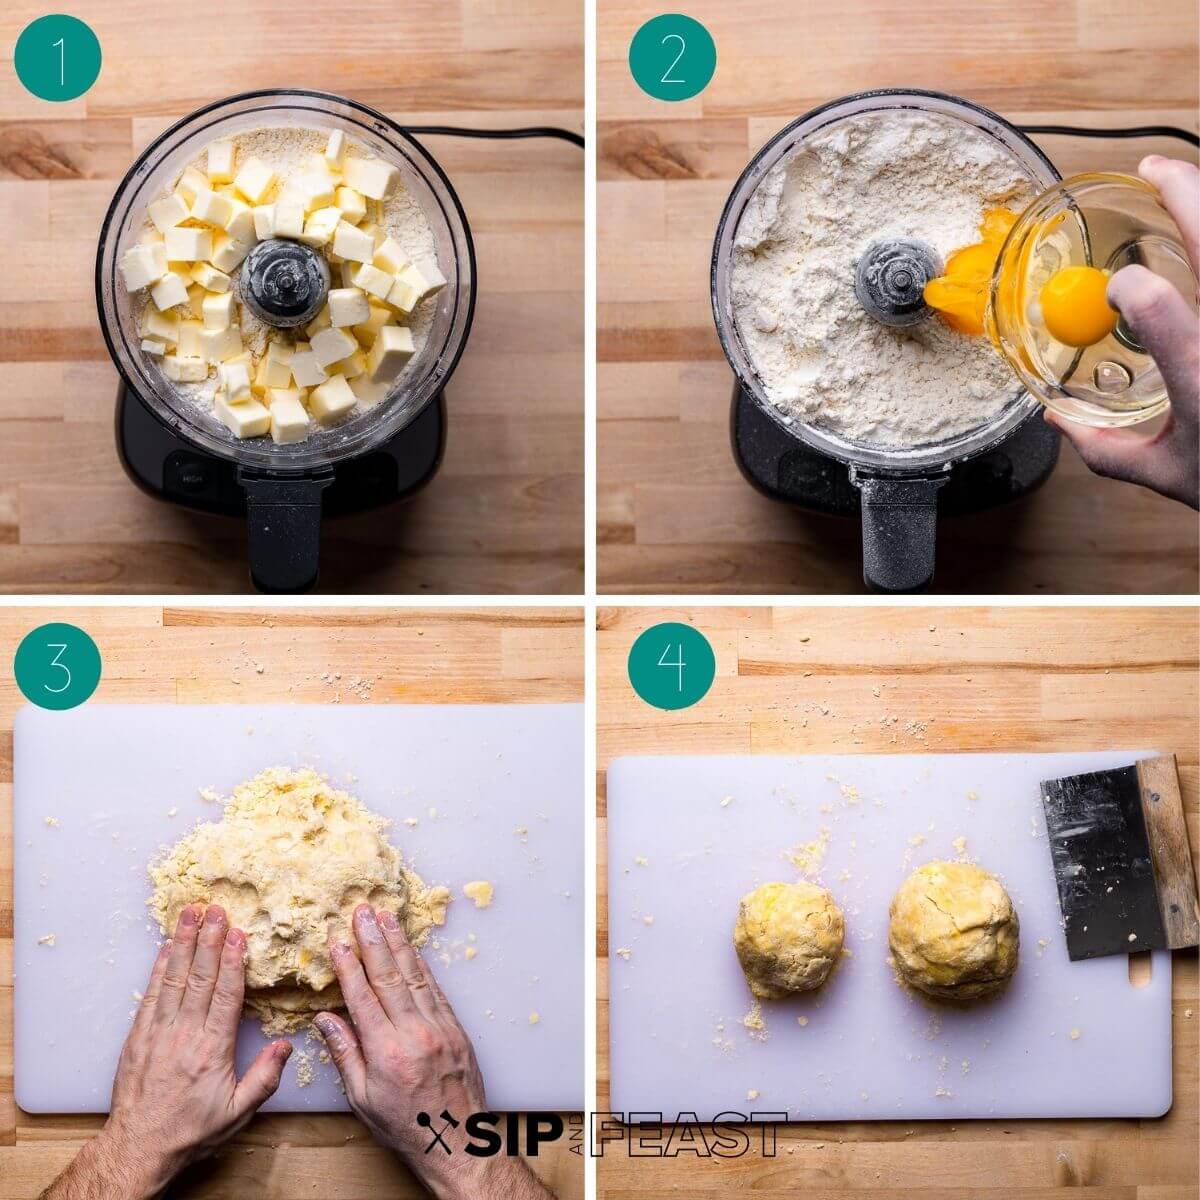
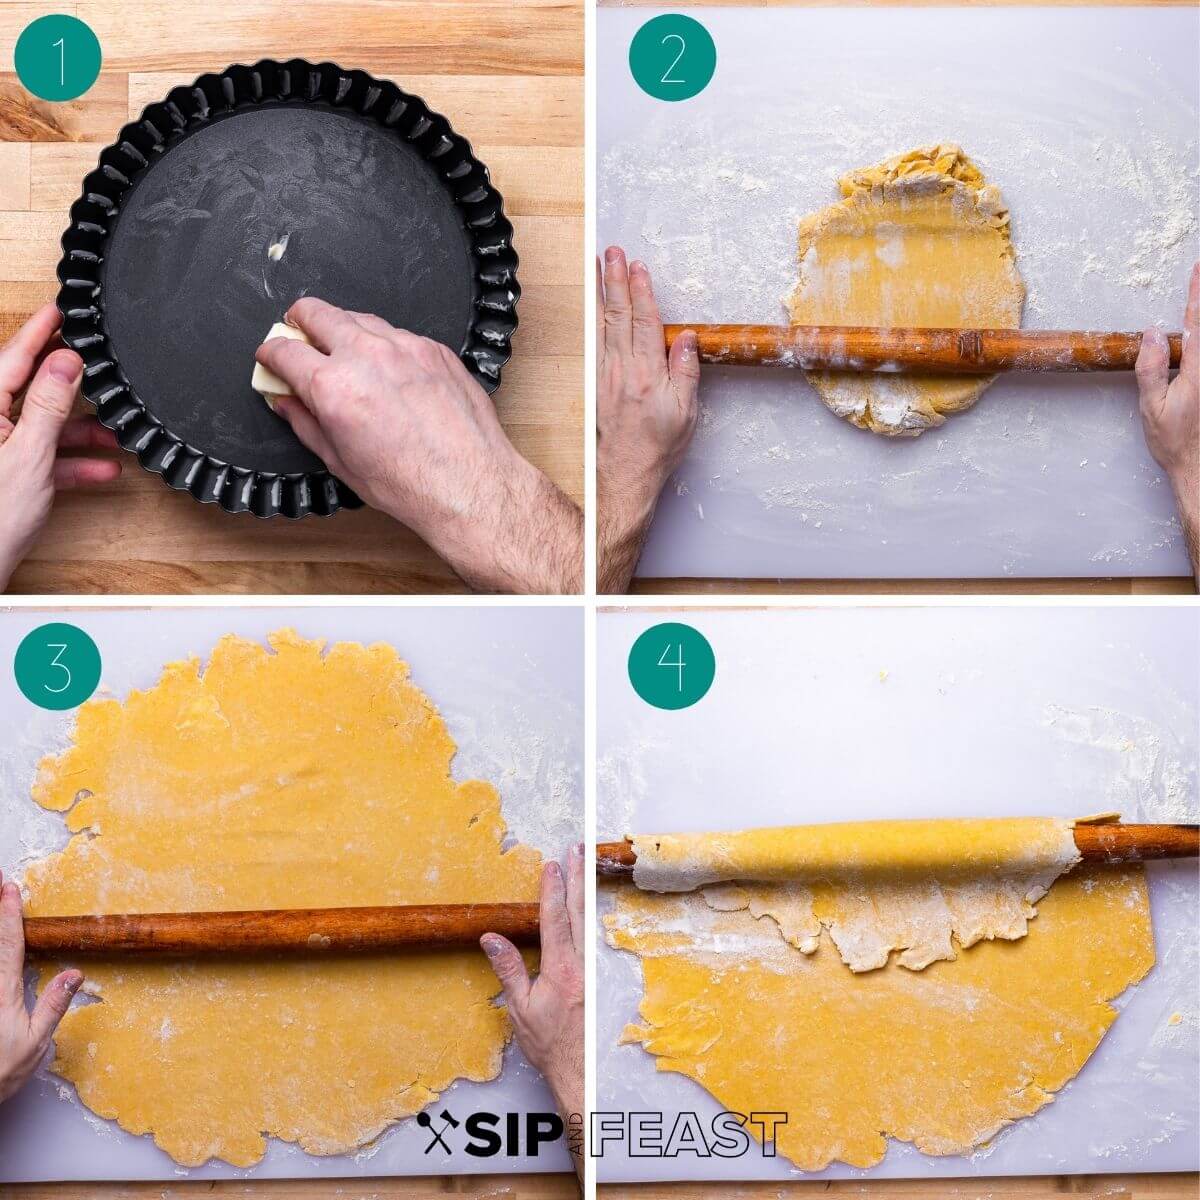
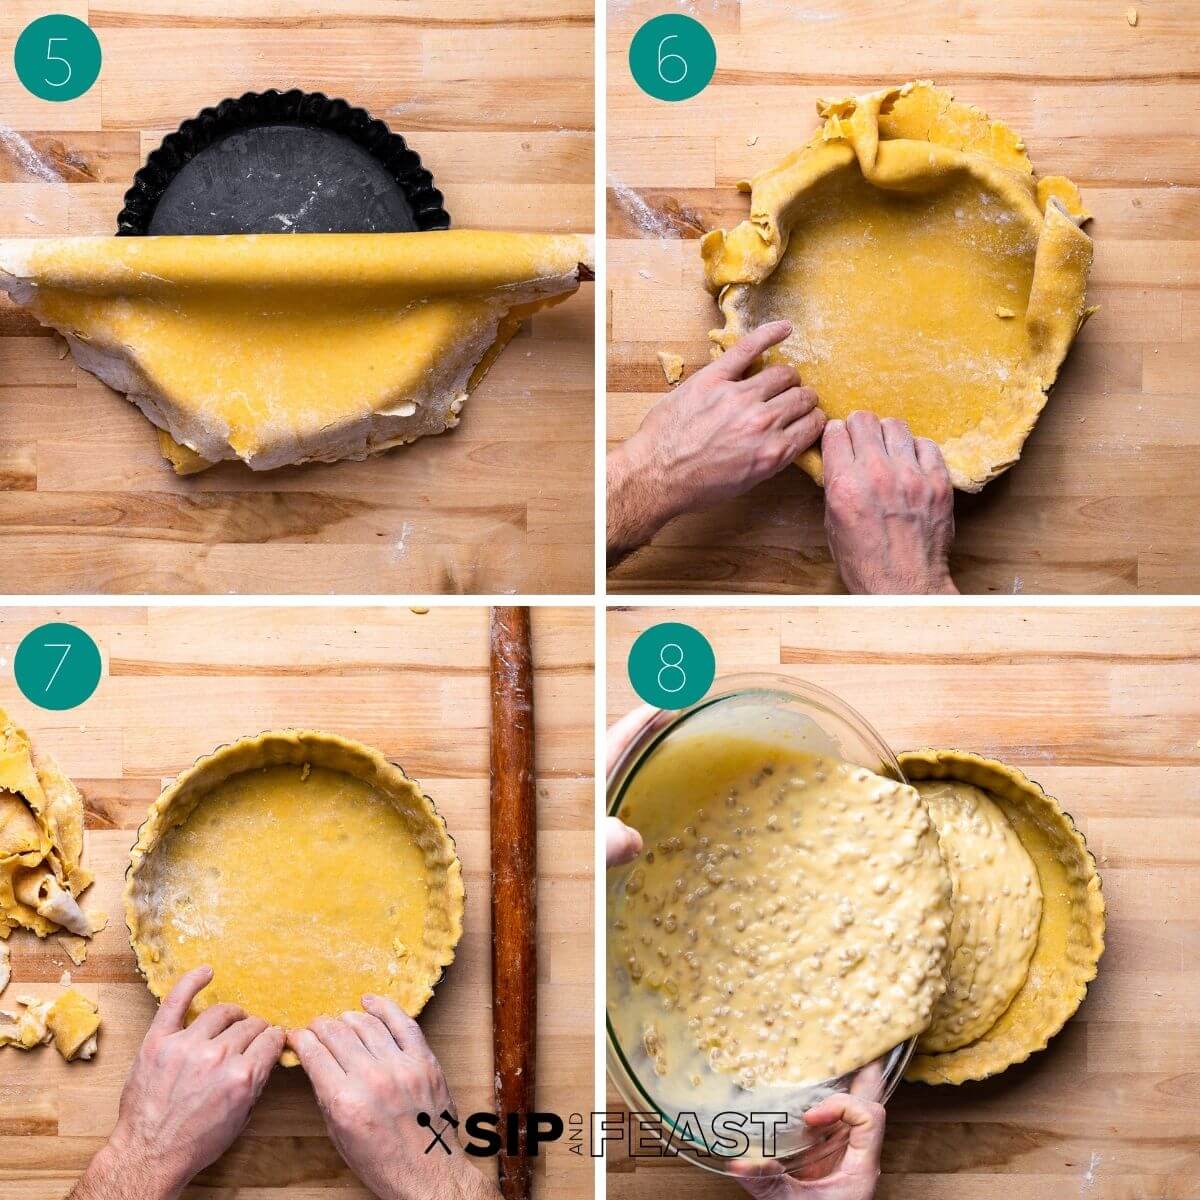
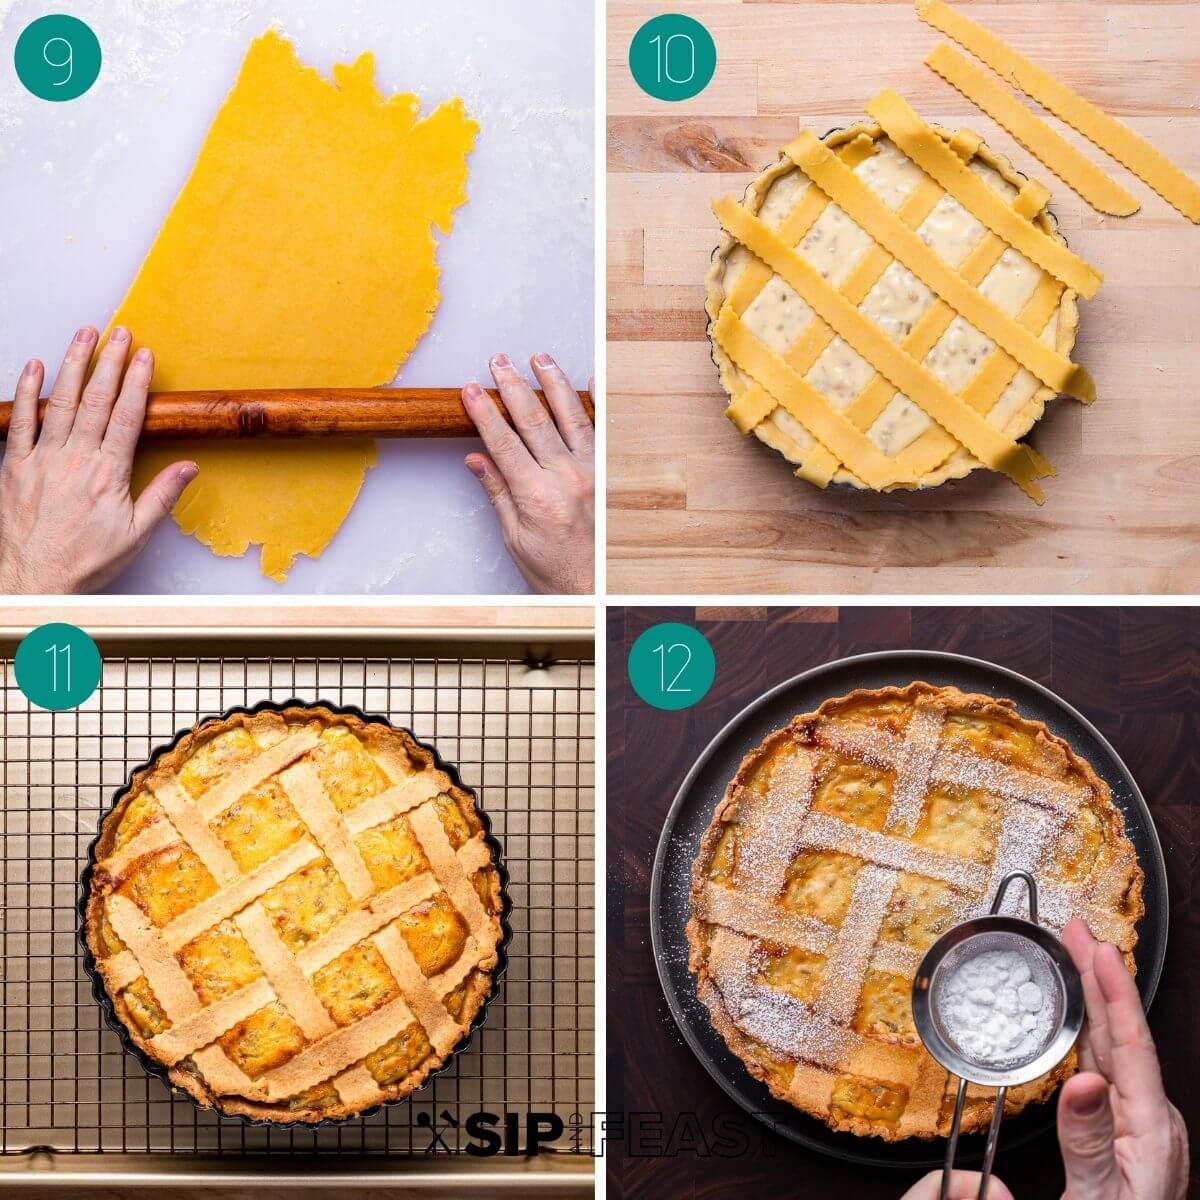
Each number corresponds to the numbered written steps below.
First, make the wheat cream
- In a saucepan over low heat cook 22 ounces of canned grano cotto (this is equal to 1 1/2 cans of the typical 15-ounce can sold in stores – you could also use a 20.5 ounce jar which would be fine since it’s so close to the 22-ounce amount). Also, add in 1 cup of milk, 1 tablespoon orange zest, 2 teaspoons sugar, 2 tablespoons unsalted butter, and a 1/8 teaspoon of fine sea salt. Just cook the mixture for about 10-15 minutes or until a porridge is formed. Note: In the pic below, I threw in an orange peel as well, but zest is better, especially if you are not going to let the filling sit in the fridge overnight. Make sure you remove the orange peel prior to filling the pie.
- Remove the wheat cream from the heat and place it in a bowl or just off to the side in the pan. Placing it in a bowl will allow it to cool a bit quicker.
Next, make the filling
- Add 1 pound of drained ricotta and 1 cup of sugar to a large bowl and whisk to incorporate. Note: Make sure to drain the ricotta overnight or you can place it all in a large cheesecloth and squeeze most of the water out in a quicker manner.
- Next, add the cooled wheat cream to the bowl along with a 1/4 teaspoon of cinnamon, 1/4 teaspoon vanilla extract, 1 teaspoon orange blossom water, and 3 ounces of candied citron.
- Mix together well and give the filling a taste test. I’ve used a few brands of orange blossom water and they all are a little different in the potency department. If you need more orange blossom water or cinnamon or vanilla, now is the time to add it. Don’t go crazy though!
- Once satisfied with the taste, mix in 3 large eggs. The filling is best made the day before so that the flavors can more fully develop. But don’t worry, it will still taste great if you’re doing it all in one day.
Make the pastry dough
- To a food processor, add 2 1/2 cups (320 grams) flour, 1/8 teaspoon fine salt, 1/3 cup sugar, and 2 teaspoons of lemon zest to a bowl of a food processor and pulse to mix the ingredients. Add 12 tablespoons of cold butter cubes and pulse again for about 30 seconds. You should have small coarse pieces. If the butter is still too large, just pulse once more until the pieces aren’t too large. Note: You can also cut the butter into the flour with a pastry cutter, fork, or by grating the butter with a box grater.
- Next, add 2 eggs and 3 tablespoons of milk and pulse just until a rough crumbly dough is formed.
- Place the dough onto a work surface and knead for a few seconds only. You just want to bring the dough together. Form two unequal size balls. Make one large ball with 2/3’s of the dough and the other smaller one with the remaining dough. The larger one will be for the base of the pie and the smaller will be used to make the design on top.
- Wrap the balls in plastic wrap and refrigerate for 1 hour before using. The dough can be made 1 day ahead of time. Top tip: You can make both the wheat cream and the dough the day before so that the flavors better meld. This will make less work the next day for baking time.
Finally, assemble and bake
- Preheat the oven to 375f and set one rack to the lowest level and the other to the middle level. Using butter or lard, grease a 9.5 by 2″ pie or tart pan. I’m using a pan with a removable bottom which makes the process much easier.
- Remove the dough from the fridge and wait 10-20 minutes for it to warm up (it will be hard to roll and will break apart if it’s too cold). Flour your work surface and rolling pin and begin rolling the large ball.
- Roll it out to a circle approximately ¼-inch thick and about 13-inches in diameter.
- Place the dough onto your rolling pin as shown in pic 4 above. Note: you can also roll it out onto parchment or wax paper and transfer it in that manner.
- Bring the dough to the pan and center it so that it falls evenly into the pan.
- Tuck in the edges letting the excess overhang.
- Trim off the excess overhanging dough. Any open spots should be patched with the excess dough.
- Pour the filling into the pan. Don’t fill it all the way up to the top. You likely won’t have excess, but if you do, set aside.
- Roll out the second smaller ball to a circle a bit larger than the pie pan. Cut into strips approximately ½-inch wide. Note: Traditionally, 7 pieces are applied in a diamond formation to mimic the look of window panes. The dough wouldn’t be overlapped as I have done below in pic 10, however, this is merely aesthetics and any type of design can be used.
- Use your fingers or a spoon to press the strips down into the corners so that they stick. If needed a touch of water can be used to “glue” the strips to the sides. Cut off any excess dough. Place the pie onto a baking sheet to prevent any drips.
- Bake for 20 minutes on the bottom rack then move to the middle. Total baking will take 65-70 minutes or until golden brown. Check the pie at the halfway point and if it looks like it’s getting too brown cover loosely with foil. You can cover just the edges or the whole pie depending on how brown it is getting. I didn’t need to cover mine at all.
- Remove from the oven and place on a wire rack to cool. Once the pie cools, remove it from the pie pan and sift powdered sugar on top before serving. Enjoy!
Top tips for perfect Pastiera Napoletana
- The grain in “grain pie”. I used canned wheat grain, or grano cotto, for my Pastiera. Most Italian grocery stores will carry this product around Easter time. If you can’t find it, you can always purchase grano cotto from Amazon all year round.
- The ricotta. Be sure to strain the ricotta to remove excess moisture and prevent your filling from being too wet. This is a common technique that is employed in many Italian desserts such as cannoli and cheese cake. Simply place the ricotta in a fine mesh strainer placed on top of a bowl and drain overnight in the refrigerator. Alternatively, if you don’t want to wait overnight, place the ricotta in cheesecloth and twist and squeeze it to remove as much moisture as possible.
- The filling. Taste test your filling prior to adding the eggs so you can make any adjustments necessary to cinnamon, vanilla, or orange blossom water.
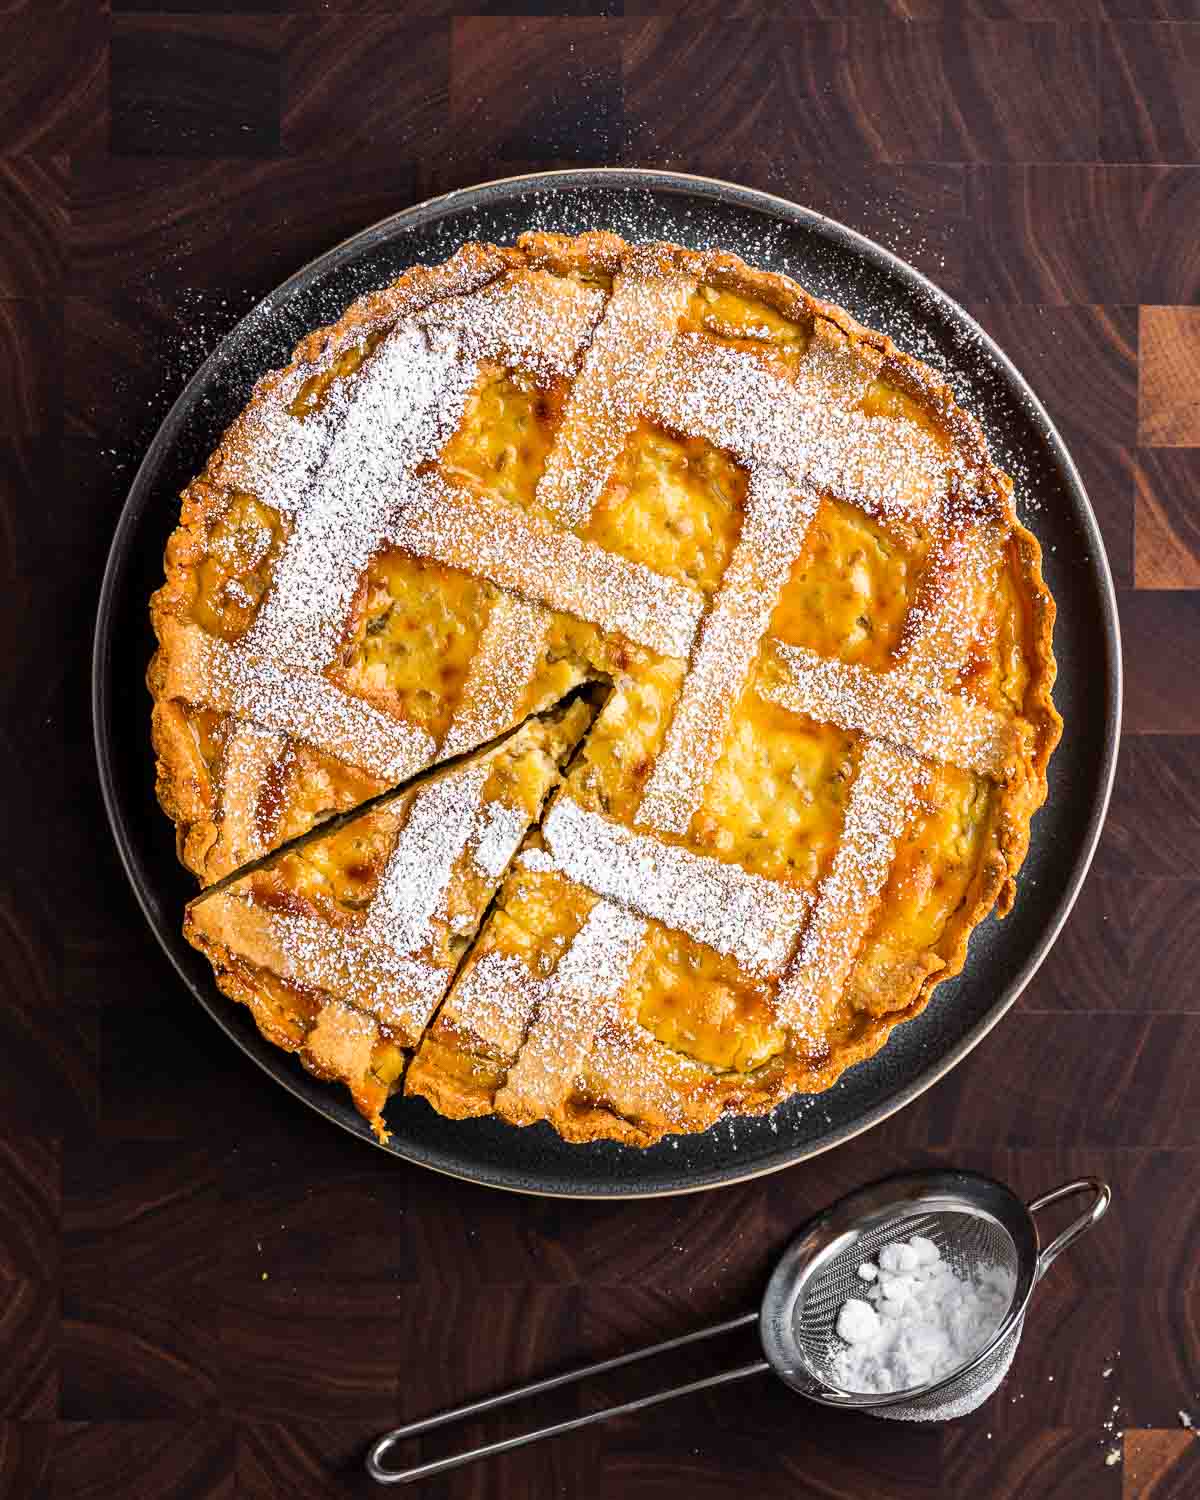
- The crust. The top of the pastiera Napoletana is traditionally made with 7 strips of dough (to represent 7 roadways in Naples) and arranged in such a way to resemble the window grates in Naples. Mine isn’t done in that manner, but taste-wise there is no difference.
- Baking. It’s important to note that all ovens are different. I baked mine on the bottom rack for 20 minutes before moving to the middle rack. The total baking time will be 60-65 minutes depending on your oven. If you find that your crust or edges are getting too brown, you can cover them lightly with foil to prevent additional browning.
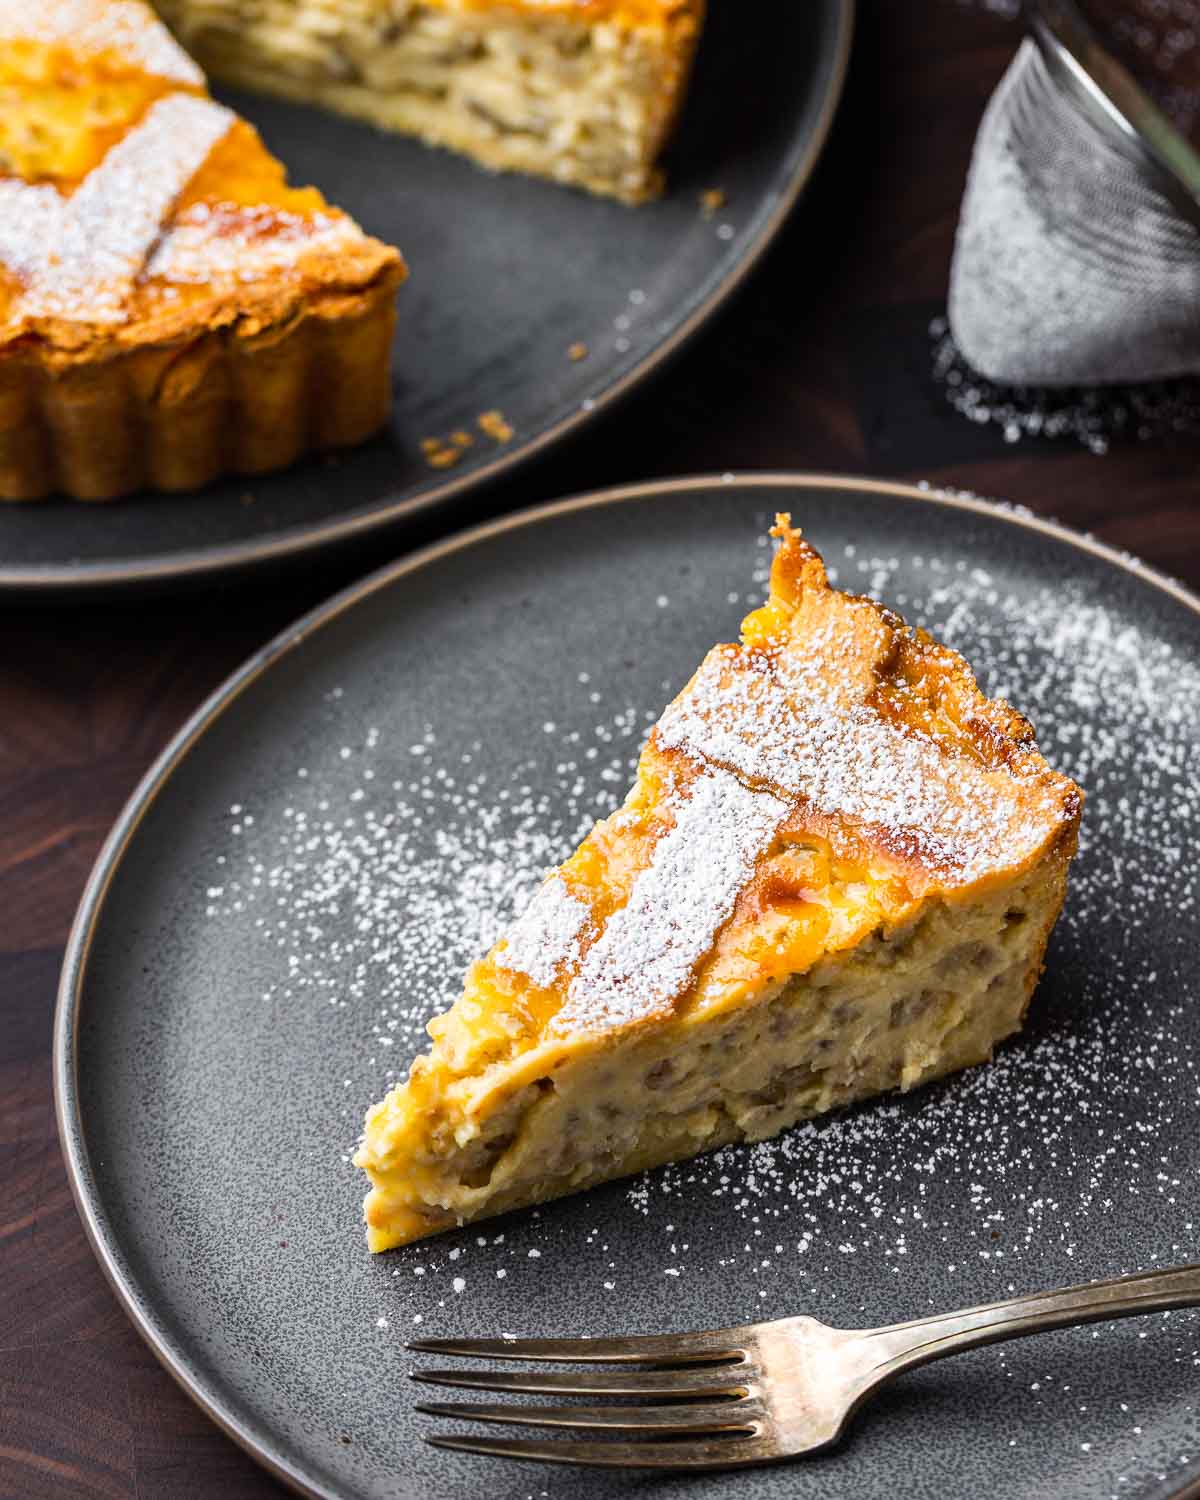
- Serving the pastiera. Italian grain pie can be served cold or warmed up a bit. I will usually make this a few days ahead of time and store in the refrigerator until ready to serve. Right before serving, dust with some confectioner’s sugar. Serve along with other desserts, such as struffoli and be sure to save a slice for yourself to enjoy with your coffee or tea the next morning – you’ve earned it. 🙂
More Great Easter Recipes
- Pizzagaina – Savory meat and cheese pie traditionally served for breakfast on Easter morning.
- Roasted boneless leg of lamb – With garlic and rosemary – perfect Easter main course.
- Baked cauliflower – Simple dish with breadcrumbs, garlic and Pecorino.
- Baked artichoke hearts – Canned artichoke hearts baked with breadcrumbs and garlic in a white wine and lemon sauce.
- Stuffed artichokes – The classic filled with breadcrumbs and garlic and baked in a lemon white wine and butter sauce.
- Lemon ricotta cookies – Ricotta and lemon zest flavored cookies topped with a creamy glaze and nonpareils sprinkles.
- Pignoli cookies – Soft and chewy on the outside, studded with pine nuts on the outside these almond-flavored cookies are a must at any holiday dessert table!
If you’ve enjoyed this Pastiera Napoletana or Easter grain pie recipe, give it a 5-star rating and leave a review.
Some people learn by watching. If you’re that type of person, you can find most of our recipes on YouTube and our Facebook Page.
Pastiera Napoletana
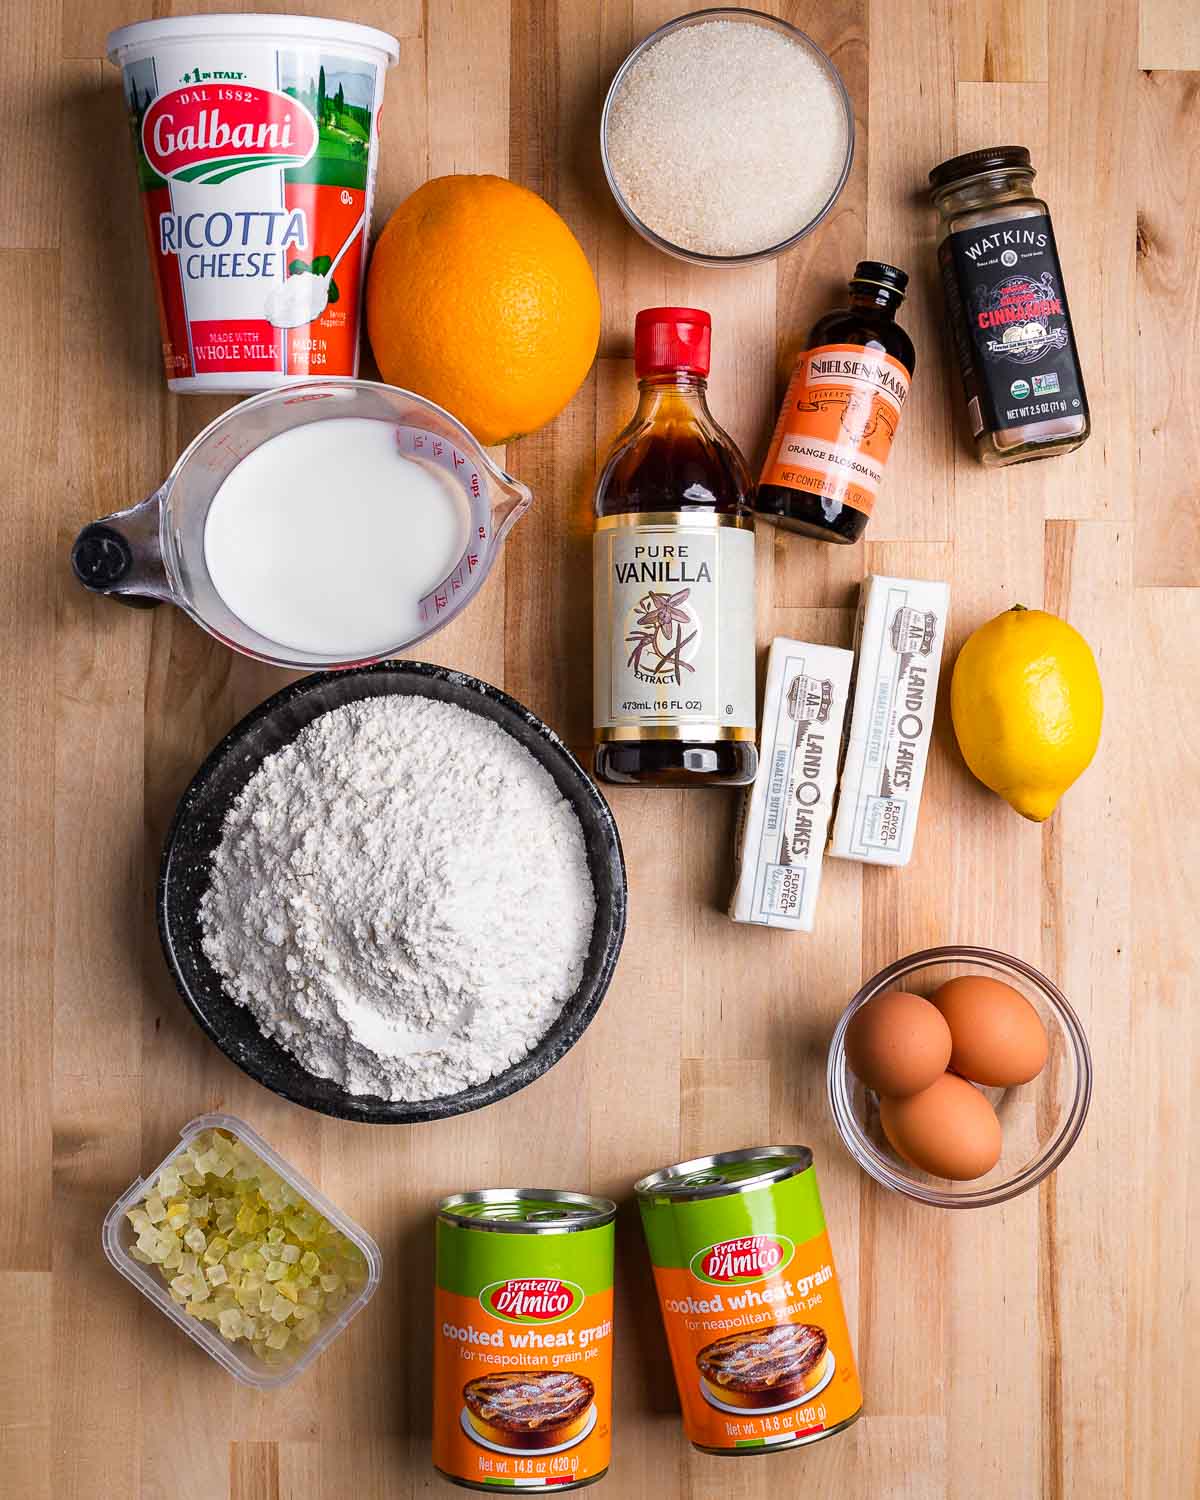
Ingredients
For the wheat cream
- 22 ounces (630g) canned wheat grain (grano cotto) see notes below
- 1 cup (240g) milk
- 1 tablespoon orange zest
- 2 teaspoons sugar
- 2 tablespoons (28g) unsalted butter
- 1/8 teaspoon fine sea salt
For the filling
- 1 pound ricotta drained overnight
- 1 cup (200g) granulated sugar
- 3 large eggs
- 1/4 teaspoon cinnamon
- 1/4 teaspoon vanilla extract
- 1 teaspoon orange blossom water
- 3 ounces (85g) candied citron cut into tiny pieces
For the dough
- 2 teaspoons lemon zest
- 2 1/2 cups (320g) all-purpose flour
- 12 tablespoons (170g) cold butter cubed
- 2 large eggs
- 1/8 teaspoon fine sea salt
- 1/3 cup (75g) granulated sugar
- 3 tablespoons (45g) milk
For serving
- 2 tablespoons powdered sugar for dusting
Instructions
For the wheat cream
- Place all of the wheat cream ingredients into a large pot and cook over low heat until the mixture softens (about 10 minutes). Stir frequently to avoid burning, then remove from the heat and set aside to cool.
For the filling
- Add the ricotta and sugar to a large bowl and whisk to incorporate.
- Add the cooled wheat cream to the filling mixture. Also, add all of the remaining filling ingredients, except for the eggs, and mix once more.
- Taste test and if needed add more orange blossom water, cinnamon, sugar, or vanilla. Once satisfied, add in the eggs and whisk together.
- The filling should be covered and refrigerated overnight for the flavors to meld. If you don't have the time, at least try to refrigerate for a few hours.
For the dough
- Add the flour, salt, sugar, and lemon zest to the bowl of a food processor and pulse to mix the ingredients. Add the cold butter cubes and pulse again. You should have small coarse pieces.
- Next, add the eggs and milk and pulse just a few times until the dough is formed.
- Place the dough onto a work surface and knead for a few seconds only. You just want to bring the dough together. Form two unequal sized balls. Make one large ball with 2/3s of the dough and the other smaller one with the remaining dough.
- Wrap the balls in plastic wrap and refrigerate for 1 hour before using. The dough can be made 1 day ahead of time.
Assemble and bake
- Preheat oven to 375f and set one rack to the lowest level and the other to the middle level. Grease with butter or lard a 9 by 2" pie or tart pan.
- Remove dough from the fridge and wait 20 minutes for it to warm up. Roll out the larger ball to a circle approximately 1/4-inch thick and about 13-inches round. Place the dough into the pan and tuck in the edges letting the excess overhang. Trim off the excess overhanging dough. Any open spots should be patched with the excess dough.
- Pour the filling into the pan. Don't fill it all the way up to the top. You shouldn't have enough filling to reach the top, but hold off if you do.
- Roll out the second smaller ball to a circle a bit larger than the pie pan. Cut into approximately 1/2-inch wide strips.
- Place the strips into a diamond formation about 2 inches apart.
- Use your fingers or a spoon to press the strips down into the corners so that they stick. If needed a touch of water can be used to "glue" the strips to the sides. Cut off any excess dough. Place the pie onto a baking sheet to prevent any drips.
- Bake for 20 minutes on the bottom rack then move to the middle. Total baking will take 65-70 minutes or until golden brown. Check the pie at halfway point and if it looks like it's getting too brown cover loosely with foil. You might have to cover just the edges or possibly the whole pie depending on how brown it is.
- Remove from the oven and place on a wire rack to cool. Once the pie cools, remove it from the pie pan and sift powdered sugar on top before serving. Enjoy!
Notes
- Makes 12 servings.
- Grano cotto can be purchased in Italian specialty stores or some supermarkets during Easter time or all year long from Amazon and other online sellers.
- Sprinkle powdered sugar before serving and when cold so that it doesn't melt.
- Testing the filling is very important to get the flavor right. Make adjustments to suit your taste. Refrigerating overnight will further intensify the flavor of the filling.
- Leftovers can be saved for up 4 days.
Nutrition
Nutrition information is automatically calculated, so should only be used as an approximation.


I just ordered some Grana Cotto from Amazon. They had a great deal, and Easter is just around the corner!
Thanks for this recipe!
We hope you love it, Theresa!
This was always my very favorite pie (growing up in an Italian home and large family in Yonkers, NY). Been living in North Carolina for the past 30 years and this is the first time I’ve seen a recipe for this delectable pie; hoping I can find all the ingredients. Meanwhile, thanks much for sharing!
this looks suspiciously similar to my husband’s Nanni’s rice pie. have you ever tried this with cooked rice, instead of wheat? with spring coming, am thinking i might try the variation.
Hi Lisa, I’ve made a similar dessert with rice but we haven’t actually tried substituting rice for grana cotto in this particular recipe.
The easiest recipe to follow, I also make this for Christmas, I’ll share this with friends, thanks Jim
Hope you enjoy, Mario!
Jim I made this grain pie and it was great, but I did have some filling left over since my tart pan was small 9 x 1.5. Can I freeze the left over filling ? I am purchasing the right size pan and want to make another pie with the leftovers.
Hi Rita, yes, you can freeze the filling. I am so happy you enjoyed!
Hi Jim!
Thank you for posting my favorite recipe too:)
My mom made this for Easter and unfortunately I never had the recipe or was home while she baked them.
Her friend used to substitute Barkey for the wheast(?) I was wondering if quinoa could be used as a GF substitute??
Thank you again and Happy Cooking!
Hi Teri, thanks for the comment! I haven’t tested this recipe using quinoa so I can’t say for sure. If you do happen to try it, please let us know how it turns out.
Hi Jim, I was wondering for this Easter pie it says 3 oz of candied citron. What kind do you use since there are so many different ones to choose from. I bake and cook a lot but never made this pie because I honestly don’t eat it and because my brother brings it to me every year. His friend makes so many of them. He gives them out to his staff and customers. Love all your recipes. We have so many similar recipes. Keep up the amazing work you do.
Hi Anna, thanks for the comment and kind words. So happy you’re enjoying the recipes! I don’t recall the brand name of the citron brand that I used but it was from Italy and I purchased it from Uncle Giuseppe’s here on Long Island. You can see in the ingredient photo what it looks like (bottom left).
Great recipe, I made the pastiera and it was delicious!! It tasted just like I remembered.
Thank you, Madeleine! So happy you enjoyed the pastiera!